一些SpringBoot中的常用的依赖注入注解。

一、@SpringBootApplication

该注解是 SpringBoot 项目的基石,创建 SpringBoot 项目之后会默认在主类加上,开启Bean管理。

1
2
3
4
5
6
@SpringBootApplication
public class SpringTemplateApplication {
public static void main(String[] args) {
SpringApplication.run(SpringTemplateApplication.class, args);
}
}

@SpringBootApplication可以看作是 @SpringBootConfiguration@ComponentScan@EnableAutoConfiguration, 这三个注解的集合。

1
2
3
4
5
6
7
8
9
10
11
12
13
14
15
16
17
18
19
// @SpringBootApplication
@Target({ElementType.TYPE})
@Retention(RetentionPolicy.RUNTIME)
@Documented
@Inherited
@SpringBootConfiguration
@EnableAutoConfiguration
@ComponentScan(
excludeFilters = {@Filter(
type = FilterType.CUSTOM,
classes = {TypeExcludeFilter.class}
), @Filter(
type = FilterType.CUSTOM,
classes = {AutoConfigurationExcludeFilter.class}
)}
)
public @interface SpringBootApplication {
...
}

这三个注解的作用:

  • @SpringBootConfiguration: 在Spring 上下文中注册额外的 Bean 或导入其他配置类
  • @ComponentScan: 扫描被 @Component、@Service、 @Controller、@Configuration注解的类,该注解默认会扫描该类所在的包下所有的类,并将其注册到容器中。
  • @EnableAutoConfiguration: 启用 SpringBoot 的自动配置

二、Bean注册

我们知道 Spring 的作用之一就是实现了依赖注入(DI)控制反转(IoC),当我们的需要使用某个类时不再需要手动创建该类的实例对象,而是从Spring容器中取出该对象,由 Spring 管理的对象它们不再相互依赖而是都依赖于 Spring。

首先我们将要由spring管理的对象放入 spring 容器中, 这一过程通常称之为注册Bean, 通过注解注册Bean主要有以下两种形式。

@Component 类注解

@Controller、@Service、@Repository、@Component 注解的类会纳入 Spring 容器中进行管理。

@Controller@Service@Repository 注解是用于标注 MVC 架构中的三个角色:控制器、服务层、数据访问层。这三个注解是对 @Component 注解的细化,它们都可以注册 Bean。其中,@Controller 用于标注控制层组件,@Service 用于标注业务层组件,@Repository 用于标注数据持久化层组件。

通常情况下,@Component 注解和三个细化注解的作用是一致的,也可以说这三个注解是语义化了的@Component,只是为了更好地区分角色而已。例如,在一个简单的 Spring MVC 应用中,我们可以写下如下的代码:

1
2
3
4
5
6
7
8
9
10
11
12
13
14
15
16
17
18
19
20
21
22
23
24
25
26
27
28
29
30
31
32
33
34
35
36
@Controller
@RequestMapping("/user")
public class UserController {
@Autowired
UserService userService;

@RequestMapping("/list")
public String list(Model model) {
List<User> users = userService.findAll();
model.addAttribute("users", users);
return "user/list";
}
}

@Service
public class UserServiceImpl implements UserService {
@Autowired
UserDao userDao;

@Override
public List<User> findAll() {
return userDao.findAll();
}
}

@Repository
public class UserDaoImpl implements UserDao {
@Autowired
JdbcTemplate jdbcTemplate;

@Override
public List<User> findAll() {
return jdbcTemplate.query("SELECT * FROM user", new BeanPropertyRowMapper<>(User.class));
}
}

在这个例子中,我们通过 @Controller@Service@Repository 注解来标注三个不同的角色,并在需要的地方进行注入,从而构建了一个简单的 Spring MVC 应用。这个例子展示了如何使用 @Component 注解及其三个细化注解来实现依赖注入的功能。

默认情况 bean 的名称为类名(首字母小写),可以通过 value 属性自定义 bean 的名称。

1
2
3
4
@Component("abc")
public class Hello {

}

默认情况下 bean 是单例的,可以使用 @Scope 注解指定, 在 Spring IoC 容器中具有以下几种作用域:

  • 基本作用域(singleton、prototype)
  • Web 作用域(reqeust、session、globalsession)
  • 自定义作用域。

@Bean 方法注解

@Bean 注解用于注册 Bean时添加在方法上,用于告诉方法,产生一个Bean对象,然后这个Bean对象交给Spring管理。 产生这个Bean对象的方法Spring只会调用一次,随后这个Spring将会将这个Bean对象放在自己的IoC容器中。

使用@Bean注册和使用@Component有什么不同,@Component只能局限作用于自己编写的类,如果是一个jar包第三方库要加入IoC容器的话,就需要使用@Bean了。

1
2
3
4
5
6
7
8
9
10
11
12
13
14
15
16
17
18
19
20
21
22
23
24
25
@Configuration
@ConditionalOnClass(RedisOperations.class)
@EnableConfigurationProperties(RedisProperties.class)
@Import({ LettuceConnectionConfiguration.class, JedisConnectionConfiguration.class })
public class RedisAutoConfiguration {

@Bean
@ConditionalOnMissingBean(name = "redisTemplate")
public RedisTemplate<Object, Object> redisTemplate(
RedisConnectionFactory redisConnectionFactory) throws UnknownHostException {
RedisTemplate<Object, Object> template = new RedisTemplate<>();
template.setConnectionFactory(redisConnectionFactory);
return template;
}

@Bean
@ConditionalOnMissingBean
public StringRedisTemplate stringRedisTemplate(
RedisConnectionFactory redisConnectionFactory) throws UnknownHostException {
StringRedisTemplate template = new StringRedisTemplate();
template.setConnectionFactory(redisConnectionFactory);
return template;
}

}

在上面的例子中,我们使用 @Configuration 注解来标注一个Redis配置类,并在其中使用 @Bean 注解来注册 RedisTemplate Bean。这样就将RedisTemplate注入到了容器中,然后编写Redis工具类时便可以注入这个第三方类库中的类。

三、依赖注入

上一节我们将对象注册到了 Spring,现在当我们需要使用这些对象的时候便可以从spring中取出它们,这一操作被称为依赖注入,通常使用下面几个注解完成。

@Value

注入int、float、String等基本数据类型,只能标注在成员变量、setter方法上。

1
2
3
4
5
6
7
8
9
10
11
12
13
@Component
public class Test {
// spring 会自动将引号中的值转换为需要的类型。
// 标注在成员变量
@Value("20")
private int age;

// 标注在 setter 方法上
@Value("20")
public void setName(int age) {
this.age = age;
}
}

@Value不能和 参数是该成员变量的构造方法 一同使用。若使用@Value注入了age字段,该类中就不能有 Test(int age) 这个构造方法。
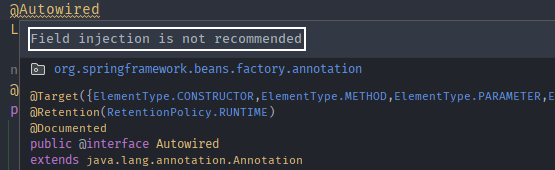
@Autowired

按类型自动装配,可标注在成员变量(官方不推荐)、构造方法、setter方法上。

1
2
3
4
5
6
7
8
9
10
11
12
13
14
15
16
17
18
@Component
public class Test {
// 标注在成员变量
@Autowired
private int age;

// 标注在 setter 方法上
@Autowired
public void setName(int age) {
this.age = age;
}

// 标注在 setter 方法上, 可省略
@Autowired
public Test(int age) {
this.age = age;
}
}

虽然看起来使用 @Autowired 标注在成员变量上是最方便的、简洁的,并且也是最常见,但是官方并不推荐这样做。如果我们在 IDEA 中使用的话,会看到这样一个警告:Field injection is not recommended。 这种方式存在明显的弊端,注入对象不能用final修饰,无法发现NullPointException的存在。@Autowired 缺点

可以使用构造方法注入来规避这个警告,标注在构造方法上时,可缺省@Autowired,因为使用包扫描时,如果未显式配置依赖注入,默认使用构造方法的自动装配(按参数类型)。如果在项目中使用了 lombok 那么在依赖变量前加上final修饰同时在类上加上@RequiredArgsConstructor注解即可,该注解会为我们生成一个包含常量,使用final关键字修饰的变量的私有构造方法,这样不仅能够省略简化许多代码,也解决了属性注入可能存在的空指针问题。

@Qualifier

不能单独用,需要和@Autowired搭配使用, 使bean按名称的自动装配。使用@Qualifier("beanName")声明所依赖beanname,只能标注在成员变量(官方不推荐),setter方法上。

1
2
3
4
5
6
7
8
9
10
11
12
13
14
15
16
17
18
19
20
21
22
23
24
25
26
27
28
@Component("Atest")
public class Atest implements Test {
public void fun() {
}
}

@Component("BTest")
public class BTest implements Test {
public void fun() {
}
}

// 在使用 `@Autowired` 注解时,如果容器中有多个相同类型的 `bean`,
// 则抛出 `NoUniqueBeanDefinitionException`
// 提示有多个满足条件的 bean 进行自动装配。
@Component
public class TestService {
@Autowired
private Test test;
}

// 这时候我们使用`@Qualifier`进行按名称的自动装配。
@Component
public class TestService {
@Autowired
@Qualifier("Atest")
private Test test;
}

@Resource

按名称或类型自动装配,非SpringBoot下的注解,需要第三方包 javax.annotation.jar 的支持,只能标注在成员变量、setter方法上。

默认按名称装配,当找不到与名称匹配的bean时,才会按类型装配。使用Resource注入时可以直接指beanName

1
2
3
4
5
@Component
public class TestService {
@Resource("Atest")
private Test test;
}